Sales System
Complete guide to institutional subscriptions, licensing, seat management, sales pipeline, and renewals
1. Simple Feature Overview
The Sales & Institutional Subscription System helps your team manage the full lifecycle of institutional (B2B) sales — from initial contact with a prospective institution, through pipeline tracking and negotiation, all the way to closing a deal, onboarding users, and managing renewals.
Here is what the system lets you do:
- Create and manage institutions — universities, libraries, schools, corporates, nonprofits — each with their own subscription plan, seats, billing details, and contact information
- Track sales opportunities — use a visual Kanban pipeline to move deals through stages (New → Contacted → Negotiating → Converted or Declined)
- Log sales activities — record calls, emails, meetings, and notes against each opportunity so your team has a complete history
- Send outreach emails — use built-in email templates or write custom emails directly from the pipeline, with attachment support
- Convert opportunities to institutions — when a deal closes, convert the inquiry into a fully set-up institution with one click
- Manage institutional users — add users (readers) to an institution, send login invitations, and track activation
- Handle renewals — renew expiring subscriptions, with automated reminder emails sent at 30, 14, and 7 days before expiry
- View sales reports — see pipeline value, conversion rates, deal sizes, and expiring subscriptions at a glance
Implementation Status: All sales features listed above are fully implemented and working. The Sales Management Module is 100% complete as of March 2026.
2. Who Should Use This Feature
| Role | What You'll Use |
|---|---|
| Sales Team | Create opportunities, track pipeline, send outreach emails, log activities, convert deals to institutions |
| Customer Success | Manage institutional users, send invitations, handle renewals, monitor activation rates |
| Operations / Admin | Create institutions directly, manage seats and billing, handle user onboarding, review reports |
| QA | Validate workflows end-to-end, verify email delivery, test invitation flows, check permission enforcement |
| Super Admin | All of the above, plus manage roles/permissions for sales staff |
3. Before You Begin
Prerequisites You Must Have in Place
Before using the sales system, the following must be configured by your admin team:
| Prerequisite | Where to Check | Why It Matters |
|---|---|---|
| Admin account with sales permissions | Settings → Admin Users → your account → Role | You need institutions:read/create/update/delete, institutions:manage_users, and institution_inquiries:read/update permissions |
| At least one subscription plan | Subscriptions → Plans | When creating an institution or converting an opportunity, you must select a subscription plan. At least one plan must exist. |
| SMTP / email configured | Settings → Integrations → SMTP Status | Invitation emails, renewal reminders, and outreach emails all require a working email configuration (SendGrid or SMTP). |
| Email templates seeded | Settings → Email Templates | The system uses templates like institutional_login, institutional_welcome, institutional_renewal_confirmation, and institutional_renewal_reminder. These are auto-seeded on first use, but verify they exist. |
| Cron jobs running | Deployment configuration | Automated renewal reminders (/api/cron/institutional-renewal-reminders) and subscription expiration (/api/cron/subscription-reminders) need to be scheduled. |
Permissions Required
The system uses role-based access control. Here are the permissions relevant to sales:
| Permission | What It Allows |
|---|---|
institutions:read | View the Institutions list and details |
institutions:create | Create new institutions |
institutions:update | Edit institutions, renew subscriptions |
institutions:delete | Delete institutions |
institutions:manage_users | Add/remove/invite institutional users |
institution_inquiries:read | View the sales pipeline and opportunity details |
institution_inquiries:update | Create/edit opportunities, log activities, send emails, convert to institutions |
If you cannot see the Sales section in the left sidebar, ask your admin to assign you a role with these permissions.
4. Key Terms in Simple Language
| Term | What It Means |
|---|---|
| Institution | An organization (university, library, school, corporate, nonprofit) that has a group subscription. Think of it as a "customer account." |
| Opportunity | A potential deal in your sales pipeline. It tracks a prospective or existing institution through the sales process. Also called an "inquiry" in some parts of the system. |
| Pipeline | The visual board (Kanban) showing all your opportunities organized by their current stage. |
| Pipeline Stage | Where a deal is in the sales process: New → Contacted → Negotiating → Converted or Declined. There is also a virtual Inactive column for deals with no activity for 30+ days. |
| Opportunity Type | The kind of deal: New Inquiry (brand new prospect), Renewal (existing institution renewing), Upsell (expanding an existing deal), or Win-back (re-engaging a lost customer). |
| Seats | The number of user accounts (readers) an institution is licensed for. For example, "50 seats" means up to 50 people from that institution can access the platform. |
| Invitation | A magic link email sent to institutional users that lets them log in without a password. |
| Activation | When an invited user clicks the link and sets up their account, their status changes from "Invited" to "Active." |
| Lead Source | How the prospective institution found you: Website Form, Referral, Cold Outreach, Conference/Event, Email Campaign, Social Media, Partner, or Other. |
| Expected Value | The estimated deal value in INR (stored in paise internally, displayed in rupees). |
| Probability | Your estimate of how likely the deal is to close, expressed as a percentage (0–100%). |
| Follow-up Date | The next date you plan to contact the prospect. Overdue follow-ups are highlighted with a warning icon. |
| Renewal | Extending an institution's subscription with a new end date (and optionally adding more seats). |
| Activity | Any interaction logged against an opportunity: calls, emails, meetings, notes, status changes. |
5. Step-by-Step Setup Guide
5.1 Institution Creation and Management
Creating a New Institution
Use this when you already have a confirmed deal and want to set up the institution immediately (skipping the pipeline).
- In the left sidebar, click Sales → Institutions
- Click the "Add Institution" button (top right)
- Fill in the Basic Details section:
- Institution Name — the official organization name (required)
- Institution Type — select from the dropdown: University/College, Public Library, School (K-12), Corporate/Business, Nonprofit Organization, or Other (required)
- Contact Name — primary point of contact at the institution (required)
- Contact Email — their email address (required)
- Contact Phone — phone number (optional)
- Address — physical address (optional)
- Expand the Billing & Tax Details section (click to expand):
- GSTIN — 15-character GST identification number (optional)
- PAN Number — 10-character PAN (optional)
- Billing Address, Billing City, Billing State (dropdown), Billing Pincode — fill if different from primary address
- Fill in the Subscription Details section:
- Seats — how many user accounts this institution gets (required)
- Subscription Plan — select from available plans in the dropdown (required)
- Start Date — defaults to today (change if needed)
- End Date — defaults to one year from today (change if needed)
- Total Amount — contract value in INR (optional but recommended)
- Currency — defaults to INR
- Notes — any internal notes about this institution (optional)
- Click "Save"
The institution is created with status Active and appears in the Institutions list.
Viewing and Editing an Institution
- Go to Sales → Institutions
- Use the search bar to find an institution by name, or use the Status and Type dropdown filters
- Click the "View" button on any row (or click the row itself)
- On the institution detail page, you can see:
- Overview — all institution details, subscription dates, plan, seat usage, billing info
- Users — table of all users added to this institution
- Linked Opportunities — any renewal/upsell/winback opportunities created for this institution
- To edit details, update the fields and save
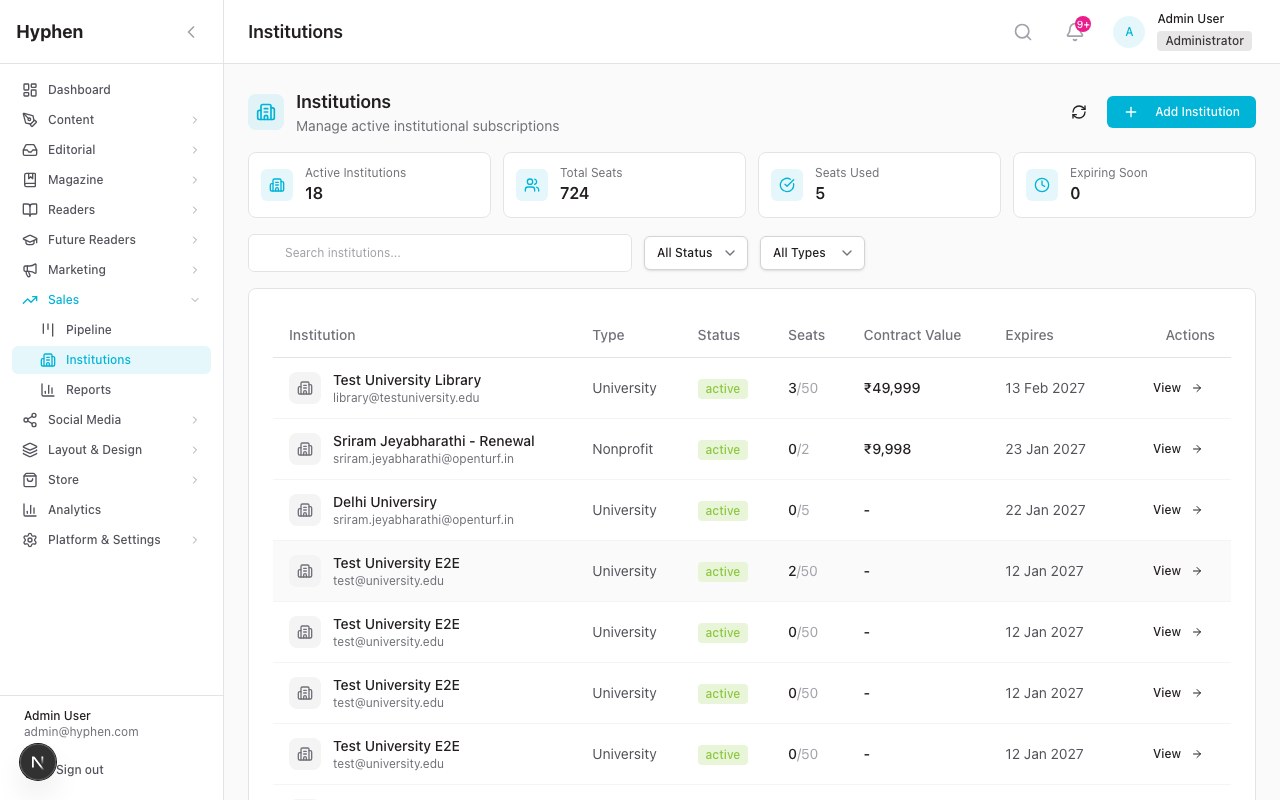
Understanding Institution Metrics
At the top of the Institutions list page, you'll see four metric cards:
| Card | What It Shows |
|---|---|
| Active Institutions | Number of institutions with status "Active" |
| Total Seats | Sum of all licensed seats across active institutions |
| Seats Used | How many of those seats are actually in use, with a utilization percentage |
| Expiring Soon | Number of active institutions whose subscription ends within 30 days |
5.2 Sales Pipeline and Opportunity Management
Accessing the Pipeline
- In the left sidebar, click Sales
- The main Sales page shows the pipeline with metrics and opportunities
Understanding the Pipeline Layout
At the top of the page, you'll see:
- Header: "Sales Pipeline" with subtitle "Manage institutional opportunities and deals"
- Metric Cards:
- Active Opportunities — count of all non-converted/non-declined opportunities
- Pipeline Value — total expected value across all active opportunities
- Avg Deal Size — average expected value per opportunity
- Converted This Month — number of deals closed this month
Below the metrics:
- Search bar: "Search opportunities..." — search by institution name, contact name, or email
- Filters: Opportunity Type dropdown (All Types, New Inquiry, Renewal, Upsell, Win-back)
- View toggle: Switch between Kanban and List views
Using the Kanban View
The Kanban board has six columns:
| Column | Color | Meaning |
|---|---|---|
| New | Blue | Freshly created opportunities, not yet contacted |
| Contacted | Cyan | You've reached out to the prospect |
| Negotiating | Amber | Active discussions about pricing, terms, etc. |
| Inactive | Orange | Opportunities with no contact for 30+ days (virtual column — cannot drag into) |
| Converted | Green | Deal closed successfully |
| Declined | Gray | Prospect said no or deal fell through |
Each column header shows:
- The stage name with a colored dot
- Number of opportunities in that stage
- Total pipeline value for that stage
Each opportunity card shows:
- Institution name (with building icon)
- Opportunity type badge (Inquiry, Renewal, Upsell, Win-back)
- Contact name (with user icon)
- Probability bar (color-coded: green for 75%+, blue for 50–74%, orange for 25–49%, red for below 25%)
- Expected value in INR (if set)
- Next follow-up date (with warning icon if overdue)
- Assigned team member (if assigned)
Pipeline Summary Bar (above the columns):
- Total Pipeline — sum of expected values
- Weighted Value — sum of (expected value × probability / 100) for all active deals
- Active Opportunities — count
Drag and Drop:
- Drag an opportunity card from one column to another to change its status
- You cannot drag into the Inactive column (it's automatically populated)
- The system updates the status immediately when you drop
Using the List View
Click the List button to switch to a table view. Columns include:
- Institution, Contact, Type, Status, Value, Created, Last Contact, Follow-up, Actions
Creating a New Opportunity
- On the Sales Pipeline page, click "New Opportunity" (top right)
- Fill in the Basic Information section:
- Institution Name — the prospect's organization name (required)
- Organization Type — select from dropdown (required)
- Contact Name — person you're working with (required)
- Contact Email — their email (required)
- Contact Phone — their phone (optional)
- Fill in the Opportunity Details section:
- Opportunity Type — defaults to "New Inquiry"; change to Renewal, Upsell, or Win-back if applicable
- Lead Source — how they found you: Website Form, Referral, Cold Outreach, Conference/Event, Email Campaign, Social Media, Partner, or Other (optional)
- Estimated Seats — how many users the prospect might need (optional)
- Fill in the Sales Metrics section:
- Expected Value — estimated deal value in INR (optional)
- Probability — your estimated close probability, defaults to 50% (0–100)
- Next Follow-up Date — when you plan to contact them next (optional)
- Add any Notes (optional)
- Click "Create Opportunity"
The opportunity appears in the New column of the Kanban.
5.3 Managing Users Within an Institution
Adding Users to an Institution
- Go to Sales → Institutions → click on the institution
- In the Users section, click "Add Users"
- Enter user details: Email and Name for each user
- Click "Add"
What happens behind the scenes:
- The system creates a Reader account for each email (if one doesn't already exist) — these accounts are passwordless initially
- The user is linked to the institution with status Active
- The institution's seat count is checked — you cannot add more users than the licensed seats
Important: Adding users does NOT automatically send them login emails. You need to send invitations separately (see next section).
Viewing User Status
The Users table on the institution detail page shows:
| Column | What It Shows |
|---|---|
| User | Email address and name |
| Status | Badge: Invited (yellow), Active (green), Deactivated (gray) |
| Invitation Sent | Date when the last invitation email was sent |
| Invitation Expires | Date when the invitation link expires (7 days from send) |
| Activated | Date when the user clicked the link and activated their account |
| Linked Reader | Whether the user has a connected Reader account |
Changing User Status
- Click the status toggle button next to a user to change them between Active and Deactivated
- Deactivating a user immediately revokes their active sessions (they get logged out)
- Click the Remove button to completely remove a user from the institution (does not delete their Reader account)
5.4 Sending Invitations to Institutional Users
Invitations send magic link login emails to users so they can access the platform without a password.
Sending Invitations (Bulk or Selective)
- Go to Sales → Institutions → click on the institution
- Option A: Send to all active users — click the "Send Invitations" button in the Quick Actions area
- Option B: Send to specific users — check the boxes next to the users you want to invite, then click "Send Invitations" in the bulk actions bar
What happens:
- Each selected user receives an email with a magic login link
- The link is unique per user and valid for a single use
- The Invitation Sent column updates with today's date
- The system prevents re-sending to the same user within 24 hours
Requirements:
- The institution must have Active status
- The subscription must not be expired
- Users must have Active status and a linked Reader account
What the User Experiences
- The user receives an email with a link to log in
- They click the link, which takes them to the Reader Portal
- If they're a new user, they set a password; if existing, they're logged in directly
- Their status changes from Invited to Active once they activate
- They receive a confirmation email (
institutional_activation_successtemplate)
5.5 Renewal Management
How Automatic Renewal Reminders Work
The system automatically sends reminder emails to the institution's contact person (not the users) at three intervals before the subscription expires:
| Reminder | When Sent | Template |
|---|---|---|
| 30-day reminder | 30 days before end date | institutional_renewal_reminder |
| 14-day reminder | 14 days before end date | institutional_renewal_reminder |
| 7-day reminder | 7 days before end date | institutional_renewal_reminder |
These are handled by the cron job /api/cron/institutional-renewal-reminders. The system prevents duplicate reminders within a 6-day window.
Manually Renewing an Institution
- Go to Sales → Institutions → click on the institution
- Click the "Renew" button in the Quick Actions area
- The Renew Subscription modal appears:
- New End Date — select the new subscription end date (must be after the current end date)
- Additional Seats — enter a number if the institution is adding more seats (optional)
- Notes — any notes about this renewal (optional)
- Click "Renew"
What happens:
- The institution's end date is updated
- If additional seats were specified, the total seat count increases
- The institution's status is set to Active (useful if it had expired)
- A Renewal History record is created (tracking previous dates, seats, and who renewed)
- A confirmation email is sent to the institution's contact person (
institutional_renewal_confirmationtemplate)
Viewing Renewal History
The renewal history is tracked in the system with full details:
- Previous end date and seat count
- New end date and seat count
- Total amount (if entered)
- Who performed the renewal and when
5.6 Converting an Opportunity to an Institution
When a deal closes and you want to set up the institution:
- Go to the opportunity detail page (click on any opportunity in the pipeline)
- Click the "Convert to Institution" button in the Quick Actions bar
- The Convert Inquiry to Institution modal appears:
- Seats — number of user accounts (required)
- Subscription Plan — select from the dropdown (required)
- Start Date — subscription start date
- End Date — subscription end date
- Total Amount — contract value in INR (optional)
- Notes — any notes (optional)
- Expand Billing & Tax Details if needed: GSTIN, PAN, Billing Address, City, State, Pincode
- Click "Convert"
What happens:
- A new Institution record is created with the contact info from the opportunity
- The opportunity's status changes to Converted
- A "Converted" activity is logged in the opportunity's timeline
- The institution appears in Sales → Institutions
- If you checked the send welcome email option, the contact person receives an email (
institutional_welcometemplate)
5.7 Logging Activities and Sending Emails from the Pipeline
Logging an Activity
- Go to the opportunity detail page
- Click the "Log Activity" button (or the dropdown arrow next to it)
- Choose the activity type:
- Log Call — record a phone conversation
- Log Email — record an email you sent outside the system
- Log Meeting — record a meeting (in-person or virtual)
- Add Note — add an internal note
- Fill in the modal:
- Subject — brief description of the interaction (optional)
- Notes — details of what was discussed (optional)
- Next Follow-up Date — set the next follow-up date (optional)
- Click "Log Activity"
The activity appears in the Activity Timeline on the opportunity page with a timestamp, the activity type icon, and who logged it.
Sending an Email from the Pipeline
- Go to the opportunity detail page
- Click the "Send Email" button
- Choose your email mode:
- Select Template — pick from 16+ pre-built templates organized by category:
- Initial Outreach: Initial Follow-up, Demo Invitation, Information Request
- Sales Process: Pricing Proposal, Proposal Sent, Contract Sent, Negotiation Follow-up, Meeting Confirmation
- Follow-ups: General Follow-up
- Renewal: Renewal Reminder, Renewal Confirmation
- Upsell: Upsell Opportunity
- Win-back: Win-back Outreach
- Post-Conversion: Welcome/Onboarding, Thank You
- Custom Email — write your own subject and body
- Select Template — pick from 16+ pre-built templates organized by category:
- Optionally set a Next Follow-up Date
- Optionally attach files using Attachments (file upload)
- Click "Send Email"
What happens:
- The email is sent to the opportunity's contact email
- A copy is CC'd to you (the sender)
- An "Email Sent" activity is logged in the timeline
- If the opportunity was in "New" status, it automatically moves to "Contacted"
- The
lastContactedAtfield is updated
Editing Contact Information
- On the opportunity detail page, find the Contact Information panel
- Click into the Contact Name, Contact Email, or Contact Phone fields to edit them
- Click "Save" to save changes
Updating Sales Metrics
On the opportunity detail page, you can update:
- Status — change using the dropdown (New, Contacted, Negotiating, Converted, Declined)
- Expected Value — update the deal value
- Probability — slide between 0% and 100%
- Next Follow-up Date — set or change the next follow-up
- Notes — add or edit notes
Changes save automatically or on clicking Save.
5.8 Creating Opportunities from Existing Institutions
You can create renewal, upsell, or win-back opportunities directly from an existing institution:
- Go to Sales → Institutions → click on the institution
- Click the "Create Opportunity" button
- Select from the dropdown:
- Create Renewal Opportunity — for subscription renewals
- Create Upsell Opportunity — for expanding the deal (more seats, higher plan)
- Create Win-back Opportunity — for re-engaging a cancelled or expired institution
- Fill in any additional details (expected value, notes, follow-up date)
- The opportunity is created and linked to this institution
The linked opportunity appears in the Linked Opportunities section on the institution detail page.
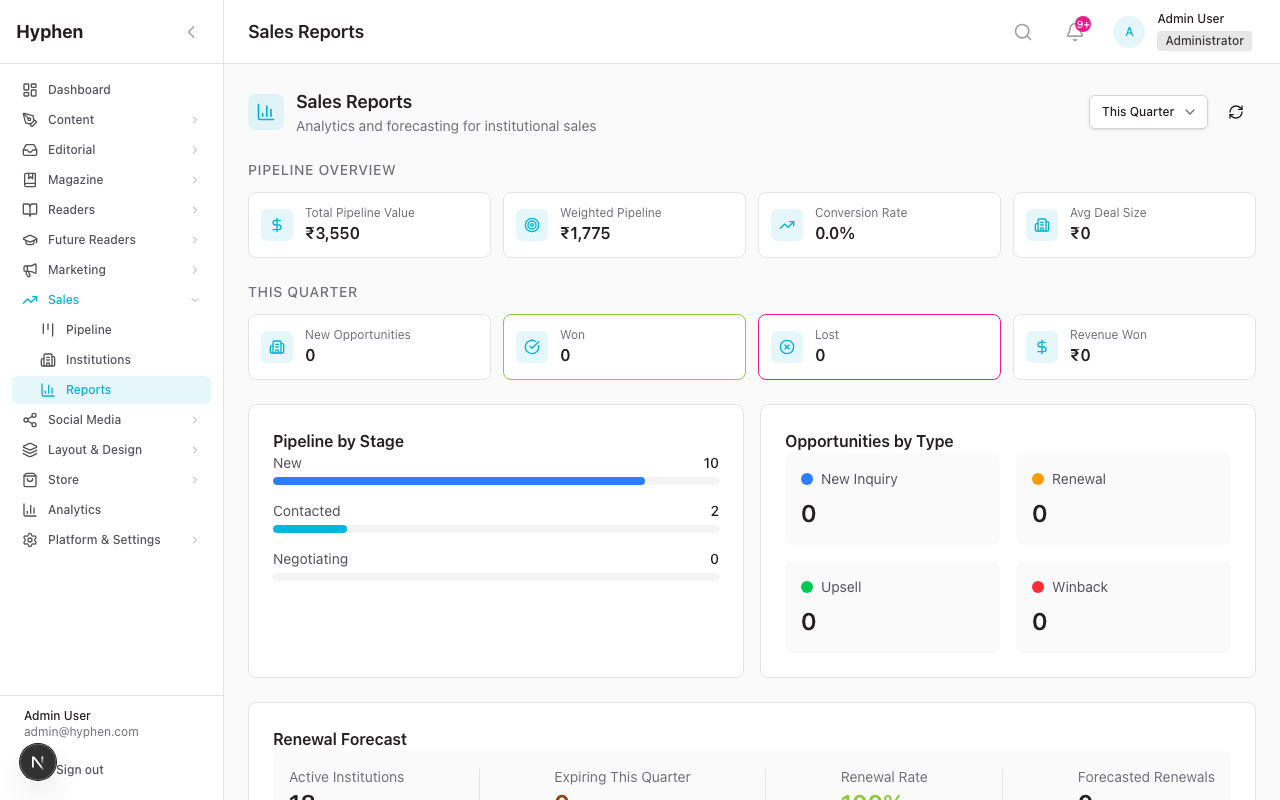
5.9 Sales Reports and Analytics
- Go to Sales → click the "Reports" button (or navigate to Sales → Reports)
- The reports page shows:
| Metric | Description |
|---|---|
| Total Pipeline Value | Sum of expected values for all active opportunities |
| Weighted Pipeline Value | Sum of (expected value × probability) — a more realistic projection |
| Conversion Rate | Percentage of closed deals that were won (converted / (converted + declined)) |
| Converted Revenue | Total value of converted deals |
| Average Deal Size | Converted revenue / number of converted deals |
| Active Institutions | Number of institutions currently active |
| Expiring This Quarter | Institutions with subscriptions ending this quarter |
- Use the Date Range filter (Month, Quarter, Year) to adjust the view
- Review the Metrics by Stage breakdown (New, Contacted, Negotiating counts)
- Review the Metrics by Opportunity Type breakdown (New Inquiry, Renewal, Upsell, Win-back counts)
6. How to Verify It Worked
After Creating an Institution
| Check | Where to Look | Expected Result |
|---|---|---|
| Institution appears in list | Sales → Institutions | New row with correct name, type, status "Active" |
| Seat count is correct | Institution detail page → Overview | Shows "0/N" used (where N is seat count) |
| Plan is assigned | Institution detail page → Overview | Plan name displayed |
| Dates are correct | Institution detail page → Overview | Start and end dates match what you entered |
After Creating an Opportunity
| Check | Where to Look | Expected Result |
|---|---|---|
| Appears in Kanban | Sales → Pipeline (Kanban view) | Card in the "New" column |
| Appears in List | Sales → Pipeline (List view) | Row with correct details |
| Metrics updated | Sales → Pipeline → metric cards | "Active Opportunities" count increased |
| Activity logged | Opportunity detail → Activity Timeline | "Created" activity entry |
After Sending Invitations
| Check | Where to Look | Expected Result |
|---|---|---|
| Invitation status updated | Institution detail → Users table | "Invitation Sent" date populated |
| Email received | Check the user's email inbox | Magic link email from the platform |
| User can log in | Reader Portal | Click magic link → user can access content |
| Status changes | Institution detail → Users table | Status changes from "Invited" to "Active" after activation |
| Active users count | Institution detail → metric cards | "Active Users" count increases |
After Renewing an Institution
| Check | Where to Look | Expected Result |
|---|---|---|
| End date extended | Institution detail → Overview | New end date displayed |
| Status is Active | Institution detail → Overview | Status badge shows "Active" |
| Seat count updated | Institution detail → Overview | Reflects any additional seats |
| Confirmation email | Check the contact person's email | Renewal confirmation email received |
| Renewal history | System records | Renewal tracked with previous/new dates and who renewed |
After Converting an Opportunity
| Check | Where to Look | Expected Result |
|---|---|---|
| Opportunity status | Sales → Pipeline | Card moved to "Converted" column |
| Institution created | Sales → Institutions | New institution in the list |
| Activity logged | Opportunity detail → Activity Timeline | "Converted" activity entry |
| Contact info carried over | Institution detail → Overview | Contact name, email, phone match the opportunity |
7. Worked Examples (End-to-End Scenarios)
Example 1: Creating a New Institution and Preparing It for Subscription Onboarding
Scenario: Delhi University has signed a contract for 200 seats on the Annual plan, starting April 1, 2026.
Steps:
- Go to Sales → Institutions
- Click "Add Institution"
- Fill in:
- Institution Name:
Delhi University - Institution Type:
University / College - Contact Name:
Dr. Priya Sharma - Contact Email:
priya.sharma@du.ac.in - Contact Phone:
+91-9876543210 - Address:
North Campus, Delhi 110007
- Institution Name:
- Expand Billing & Tax Details:
- GSTIN:
07AABCU9603R1ZM - PAN Number:
AABCU9603R - Billing Address:
Accounts Department, North Campus - Billing City:
New Delhi - Billing State:
Delhi - Billing Pincode:
110007
- GSTIN:
- Fill in Subscription Details:
- Seats:
200 - Subscription Plan: select
Annual(or your institutional plan) - Start Date:
2026-04-01 - End Date:
2027-03-31 - Total Amount:
₹5,00,000 - Notes:
Contract #DU-2026-001. Payment via wire transfer.
- Seats:
- Click "Save"
Verification:
- Go to Sales → Institutions — "Delhi University" appears with status "Active", 200 seats, 0 used
- Metric cards update: "Active Institutions" and "Total Seats" increase
Next Steps:
- Add users to the institution (Section 5.3)
- Send invitations so users can log in (Section 5.4)
Example 2: Creating and Tracking a New Sales Opportunity in the Pipeline
Scenario: You met a representative from Mumbai Public Library at a conference. They expressed interest in a 50-seat subscription.
Steps:
- Go to Sales → click "New Opportunity"
- Fill in Basic Information:
- Institution Name:
Mumbai Public Library - Organization Type:
Public Library - Contact Name:
Rajesh Mehta - Contact Email:
rajesh.mehta@mumbailib.org - Contact Phone:
+91-9988776655
- Institution Name:
- Fill in Opportunity Details:
- Opportunity Type:
New Inquiry - Lead Source:
Conference/Event - Estimated Seats:
50
- Opportunity Type:
- Fill in Sales Metrics:
- Expected Value:
₹1,50,000 - Probability:
30 - Next Follow-up Date:
2026-03-20
- Expected Value:
- Notes:
Met at LitFest 2026. Interested in digital-only plan for branch libraries. - Click "Create Opportunity"
Tracking over time:
Day 2 — Send initial email:
- Open the opportunity from the Kanban (click the card in the "New" column)
- Click "Send Email" → Select Template → "Initial Follow-up"
- Set Next Follow-up Date to
2026-03-25 - Click "Send Email"
- Status automatically changes to "Contacted"
Day 7 — Log a call:
- Click "Log Activity" → "Log Call"
- Subject:
Discussed pricing and seat options - Notes:
Rajesh is checking budget approval. Expects answer by month-end. - Next Follow-up Date:
2026-04-01 - Click "Log Activity"
Day 12 — Update probability:
- On the opportunity detail page, change Probability from 30 to 60
- Change status to "Negotiating" (or drag the card to the Negotiating column)
Day 20 — Deal closes:
- Click "Convert to Institution"
- Fill in: Seats: 50, Plan: Annual, Start Date: 2026-04-15, End Date: 2027-04-14
- Click "Convert"
- The opportunity moves to "Converted" and a new institution is created
Verification:
- Pipeline → Kanban: card is in "Converted" column
- Sales → Institutions: "Mumbai Public Library" is in the list with 50 seats
- Activity Timeline shows: Created → Email Sent → Call Logged → Status Changed → Converted
Example 3: Sending Invitations to Institutional Users and Verifying Activation
Scenario: Delhi University (from Example 1) has provided a list of 10 initial users to onboard.
Steps:
- Go to Sales → Institutions → click Delhi University
- Click "Add Users"
- Enter the 10 users' email addresses and names:
student1@du.ac.in— Anika Guptastudent2@du.ac.in— Vikram Patel- ... (repeat for all 10)
- Click "Add"
- The Users table now shows 10 users, all with status "Active" and no invitation sent
Sending Invitations:
- Click the "Send Invitations" button in Quick Actions
- The system sends magic link emails to all 10 users
- The "Invitation Sent" column updates with today's date for each user
Verifying Activation:
- Ask one of the users (e.g., Anika) to check her email and click the login link
- She is taken to the Reader Portal, sets a password, and gains access
- Go back to the institution detail page and click "Refresh"
- Anika's row now shows:
- Status: Active (green badge)
- Activated: today's date
- Linked Reader: yes
- The "Active Users" metric card increases from 0 to 1
- The "Seats Used" on the Institutions list page updates
Verification:
- Institution detail → Users table: one or more users show "Active" status
- Institution detail → metric cards: "Active Users" matches the number who activated
- Institutions list → Seats column: shows "1/200" (or however many activated)
- The activated user can access subscriber-only content on the Reader Portal
Example 4: Handling an Institutional Renewal and Checking Reminder Behavior
Scenario: Bangalore International School's subscription expires on April 15, 2026. They want to renew for another year with 20 additional seats.
Automatic Reminders (no action needed from you):
- March 16 (30 days before): The cron job sends a renewal reminder email to the contact person
- April 1 (14 days before): Second reminder email sent
- April 8 (7 days before): Third reminder email sent
You can verify reminders were sent by checking:
- The contact person's email inbox
- The institution's renewal history (the system logs REMINDER_SENT entries)
Processing the Renewal:
- Go to Sales → Institutions → click Bangalore International School
- Note the alert: "Subscription expiring within 30 days" (if within 30 days)
- Click the "Renew" button
- In the modal:
- New End Date:
2027-04-15 - Additional Seats:
20 - Notes:
Renewed for AY 2026-27. Added 20 seats for new batch.
- New End Date:
- Click "Renew"
Verification:
- Institution detail → Overview:
- End Date now shows
2027-04-15 - Seats increased (e.g., from 100 to 120)
- Status: "Active"
- End Date now shows
- Contact person receives a renewal confirmation email
- The "Expiring Soon" metric card on the Institutions list decreases
- All existing users continue to have access without interruption
Example 5: Following Up on an Institution Inquiry and Verifying Downstream Impact
Scenario: A nonprofit organization, Literacy Foundation, submitted an inquiry through the website. You need to nurture this lead and close the deal.
Step 1: Inquiry is in the pipeline
- Go to Sales → Pipeline
- Find "Literacy Foundation" in the New column
- Click the card to open the detail page
- Review the inquiry details: contact info, estimated seats, message
Step 2: Initial outreach
- Click "Send Email" → Select Template → "Information Request"
- The template auto-fills with the contact's name and institution name
- Set Next Follow-up Date: 5 days from now
- Click "Send Email"
- Status moves to Contacted
Step 3: Follow-up call
- When the follow-up date arrives, you'll see a warning icon on the opportunity
- Call the contact and log the activity:
- Click "Log Activity" → "Log Call"
- Subject:
Discussed pricing for 25 seats - Notes:
Interested in digital-only annual plan. Needs board approval. Will confirm by end of month. - Next Follow-up Date: 2 weeks from now
- Update Probability to 55%
- Drag the card to Negotiating (or change status in the dropdown)
Step 4: Close the deal
- After board approval, click "Convert to Institution"
- Fill in:
- Seats:
25 - Subscription Plan:
Annual - Start Date:
2026-05-01 - End Date:
2027-04-30 - Total Amount:
₹75,000
- Seats:
- Check "Send Welcome Email" if available
- Click "Convert"
Step 5: Onboard users
- Go to Sales → Institutions → Literacy Foundation
- Add users, send invitations (per Sections 5.3 and 5.4)
Verification of downstream impact:
| What to Check | Where | Expected Result |
|---|---|---|
| Opportunity closed | Sales → Pipeline | Card in "Converted" column with green badge |
| Institution created | Sales → Institutions | "Literacy Foundation" with 25 seats, Active status |
| Welcome email received | Contact person's inbox | institutional_welcome email with dates and details |
| Users can activate | Reader Portal | Invited users can click magic link and access content |
| Subscriber content access | Reader Portal | Activated institutional users can read subscriber-only articles |
| Reports updated | Sales → Reports | Converted Revenue and Active Institutions increase |
| Renewal reminders scheduled | Automatic | 30/14/7-day reminders will fire before April 30, 2027 |
8. Common Mistakes and How to Fix Them
"I can't see the Sales section in the sidebar"
Cause: Your admin role doesn't have institutions:read or institution_inquiries:read permissions.
Fix: Ask your Super Admin to go to Settings → Admin Users → your account, and assign a role that includes sales permissions.
"I can't add more users to the institution"
Cause: You've reached the seat limit. Fix: Either:
- Renew the subscription with additional seats (Section 5.5)
- Remove inactive/deactivated users to free up seats
- Edit the institution to increase the seat count (if you have
institutions:updatepermission)
"Invitation emails are not being sent"
Cause: Could be one of several issues:
- SMTP not configured: Check Settings → Integrations → SMTP Status. If it shows "Not configured," contact your system admin.
- Institution is not Active: Invitations can only be sent for active institutions with valid subscriptions.
- User was already invited within 24 hours: The system prevents re-sending within 24 hours to avoid spam. Wait and try again.
- User doesn't have a linked Reader account: Users must have Active status with a Reader account to receive invitations.
"I can't convert an opportunity to an institution"
Cause: Possible reasons:
- Missing permissions: You need both
institution_inquiries:updateANDinstitutions:createpermissions. - Opportunity already converted: An opportunity can only be converted once. Check if the status is already "Converted."
- No subscription plans available: At least one subscription plan must exist. Check Subscriptions → Plans.
"Drag and drop is not working on the Kanban"
Cause: You cannot drag into the Inactive column (it's read-only/virtual). You also cannot change the status of a Converted opportunity. Fix: Drag between the other columns (New, Contacted, Negotiating, Declined). For converted deals, the status is final.
"Renewal reminders are not being sent automatically"
Cause: The cron job /api/cron/institutional-renewal-reminders may not be scheduled.
Fix: Contact your DevOps team to verify the cron job is configured and running. It should run daily.
"I deleted an opportunity by mistake"
Cause: Only Declined opportunities can be deleted. If it was declined and deleted, it cannot be recovered. Fix: Create a new opportunity. For active opportunities, the delete button is disabled — only Declined status allows deletion.
"The overdue follow-up alert won't go away"
Cause: You have opportunities where the Next Follow-up Date is in the past. Fix: Open each overdue opportunity, update the follow-up date to a future date, or log an activity to update the last contact date.
"Expected value shows ₹0 or looks wrong"
Cause: The system stores amounts in paise (1/100 of a rupee) internally. Fix: Enter amounts in rupees in the UI — the system handles the conversion. If you see unexpected values, check whether the amount was entered in rupees or paise.
- Create a new institution with all required fields → verify it appears in the list with "Active" status
- Create an institution with billing/tax details → verify GSTIN, PAN, billing address are saved
- Try creating an institution without required fields → verify validation errors appear
- Edit an institution's details → verify changes are saved
- Try reducing seats below the current active user count → verify the system prevents this
- Delete an institution → verify it is removed from the list
- Filter institutions by Status (Active, Pending, Expired, Cancelled) → verify correct results
- Filter institutions by Type (University, Library, School, etc.) → verify correct results
- Search for an institution by name → verify search works
- Verify the "Expiring Soon" metric card counts institutions expiring within 30 days
- Create a new opportunity → verify it appears in the "New" column of the Kanban
- Drag an opportunity from "New" to "Contacted" → verify status updates
- Drag an opportunity to "Negotiating" → verify status updates
- Try dragging into the "Inactive" column → verify it is prevented
- Verify opportunities with 30+ days no contact appear in the "Inactive" column
- Update probability, expected value, and follow-up date → verify changes persist
- Verify the Pipeline Summary Bar shows correct Total Pipeline and Weighted Value
- Verify the "Active Opportunities" metric card shows the correct count
- Test all four opportunity types: New Inquiry, Renewal, Upsell, Win-back
- Test search functionality across institution name, contact name, and email
- Switch between Kanban and List views → verify data is consistent
- Log a Call activity → verify it appears in the Activity Timeline with correct icon
- Log an Email activity → verify it appears in the timeline
- Log a Meeting activity → verify it appears in the timeline
- Add a Note → verify it appears in the timeline
- Send a templated email → verify:
- Email is received by the contact
- "Email Sent" activity is logged in the timeline
- Status auto-moves from "New" to "Contacted" (if applicable)
lastContactedAtis updated
- Send a custom email → verify same as above
- Send email with attachment → verify attachment is included
- Convert an opportunity to an institution → verify:
- Institution is created with correct contact info
- Opportunity status changes to "Converted"
- "Converted" activity appears in timeline
- Converted institution appears in Sales → Institutions
- Try converting an already-converted opportunity → verify it is prevented
- Add users to an institution → verify they appear in the Users table
- Try adding more users than available seats → verify the system prevents it
- Send invitations → verify emails are sent (check inbox)
- Click invitation magic link → verify user can activate and access content
- Verify user status changes from "Invited" to "Active" after activation
- Deactivate a user → verify their sessions are revoked
- Remove a user → verify they are removed from the institution (Reader account preserved)
- Try sending invitation again within 24 hours → verify it is prevented
- Renew an institution → verify:
- End date is updated
- Seats are increased (if additional seats specified)
- Status is "Active"
- Renewal confirmation email is sent
- Renewal history is recorded
- Try setting new end date before current end date → verify validation error
- Verify renewal reminders fire at 30, 14, and 7 days (check cron logs or test environment)
- Log in as a user without sales permissions → verify Sales section is not visible
- Log in as a user with
institutions:readonly → verify they can view but not create/edit - Log in as a user with full sales permissions → verify all actions are available
- Verify the "New Opportunity" and "Add Institution" buttons are hidden for users without create permissions
- Verify Sales Reports page loads with correct metrics
- Verify Pipeline Value matches the sum of expected values
- Verify Conversion Rate calculation is correct
- Change date range filter → verify metrics update
- Verify institutional users can access subscriber-only content on the Reader Portal
- Verify deactivated users cannot access content
- Verify expired institutions → users lose access
- Check GDPR: anonymizing an institutional user removes their personal data but preserves institution record
| Limitation | Impact | Workaround |
|---|---|---|
| No bulk CSV import for users | You must add users one by one or in small batches via the UI | Use the API endpoint POST /api/institutions/:id/users with a list of users for bulk operations |
| Pipeline reports use partially mock historical data | Monthly trend charts may show sample data rather than real historical values | Focus on the real-time metrics (Total Pipeline, Conversion Rate, etc.) which are accurate |
| No payment collection within the pipeline | The pipeline tracks the deal but doesn't handle actual payment processing | Collect payment via Razorpay/Stripe outside the pipeline, then create or convert the institution |
| No automated opportunity creation from website forms | Inquiries from a public-facing form must be manually entered as opportunities | Create opportunities manually in the pipeline as you receive inquiries |
| Invitation magic links are single-use | If a user's link expires or fails, you need to resend from the institution page | Wait 24 hours if the system blocks resending, then send a new invitation |
| Renewal reminders only go to the contact person | Individual institutional users don't receive expiry warnings | Communicate renewal status to users through your own channels if needed |
| Cannot change institution type after creation | The institution type field (University, Library, etc.) is set at creation | Delete and recreate the institution if the type needs to change, or update via API |
| Delete is only allowed for Declined opportunities | Active opportunities cannot be deleted from the pipeline | Change the status to "Declined" first, then delete |
| No dashboard for sales team individual performance | Pipeline reports show aggregate metrics, not per-salesperson performance | Filter opportunities by assigned team member manually |
| Future Readers and Sales Institutions are separate models | If an institution is both a Sales customer and a Future Readers participant, they exist as separate records | Use the "Sync to Future Readers" action from the institution detail page to link them |
This user manual covers the Sales & Institutional Subscription System as implemented in the Hyphen Admin Console as of March 2026. All features described are fully implemented and functional. For technical API documentation, see the API Specification documents in /docs/apis/.