Future Readers Program
Complete guide to managing student programs, enrollments, access grants, and expiration handling
1. Simple Feature Overview
The Future Readers Program helps Hyphen bring students from schools, colleges, and universities onto the platform through two routes:
| Route | What the Student Does | What They Get |
|---|---|---|
| Writing Competition | Submits an original essay, poem, or short story | 100% free annual subscription (if approved) |
| Student Discount | Uploads their student ID for verification | 50% off any subscription plan |
How it works at a high level:
- An admin adds participating institutes (schools, colleges, universities) to the system.
- Students visit the Future Readers page on the Reader Portal, choose a route, and submit their application.
- An admin reviews each application — checking the student ID or reading the competition entry.
- On approval, the system automatically generates a discount coupon and emails it to the student.
- The student uses the coupon code to subscribe at a discount (or for free).
Everything is managed from the Admin Console under Future Readers in the sidebar. Students interact only with the Reader Portal.
2. Who Should Use This Feature
| Role | What They Do |
|---|---|
| Program Team / Operations | Create and manage institutes, review student enrollments, approve or reject applications |
| Marketing Team | Link institutes to outreach campaigns and events, run email campaigns targeting enrolled students |
| Sales Team | Sync educational institutions from the Sales module into the Future Readers program |
| QA Team | Test the enrollment flow end-to-end, verify coupon generation and email delivery |
| Admin / Super Admin | Configure permissions, oversee program activity, manage all institutes and enrollments |
| Customer Support | Help students who have questions about their enrollment status or coupon codes |
3. Before You Begin
3.1 Permissions Required
You need the following permissions assigned to your admin role. Ask your administrator if you do not have them.
| Permission | Needed For |
|---|---|
| SUBSCRIPTIONS_READ | Viewing the Future Readers dashboard, institutes, and enrollments |
| SUBSCRIPTIONS_CREATE | Adding new institutes |
| SUBSCRIPTIONS_UPDATE | Editing or deleting institutes, reviewing (approving/rejecting) enrollments |
| MARKETING_CAMPAIGNS_READ | Viewing campaigns linked to institutes |
| MARKETING_CAMPAIGNS_UPDATE | Creating campaigns and linking institutes to them |
3.2 System Prerequisites
Before using the Future Readers program, confirm the following are in place:
- Your admin account has the permissions listed above
- The Reader Portal is live and accessible to students (the enrollment form is at
/future-readers/enroll) - Email sending is configured (so coupon emails reach students after approval)
- The daily cron job for institution reference data sync is configured (runs at 2 AM UTC — this keeps institute data in sync for campaign form dropdowns)
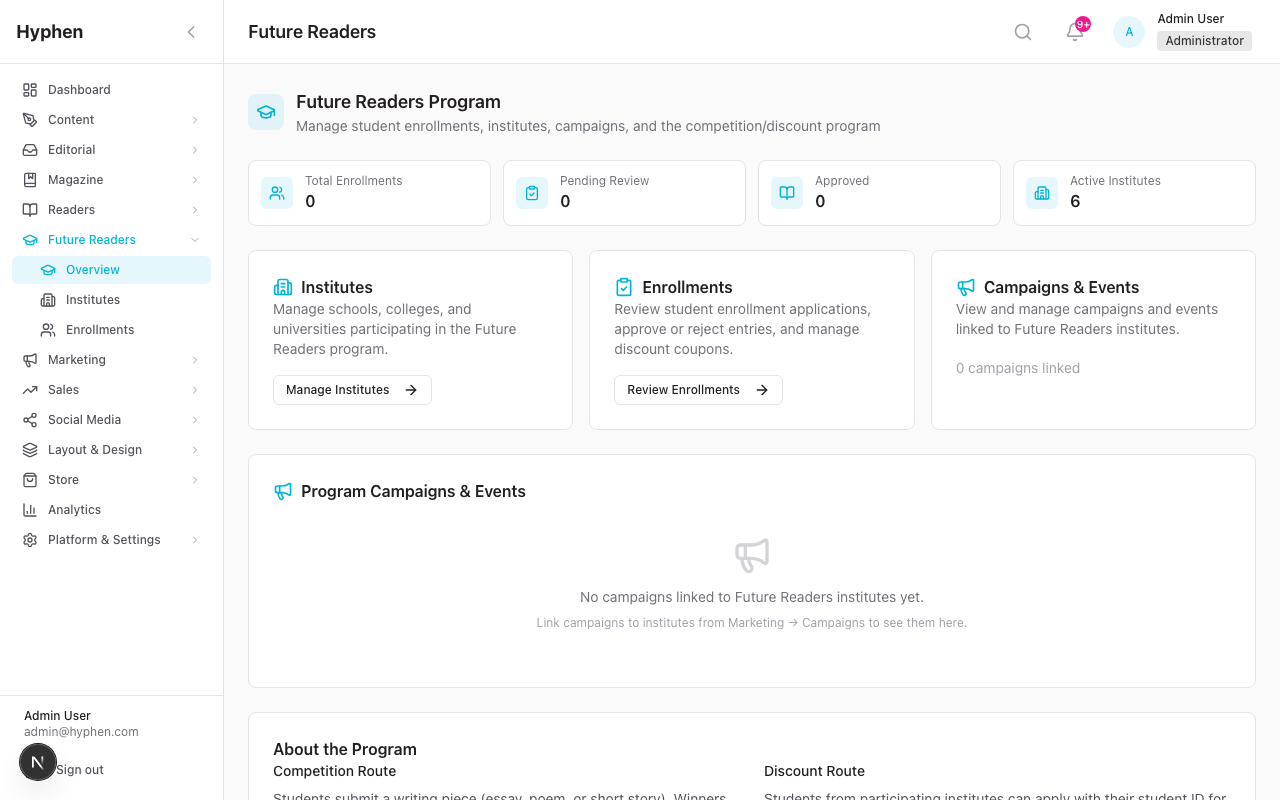
3.3 Where to Find It
- Admin Console sidebar → Future Readers — the main hub for managing institutes and reviewing enrollments
- Reader Portal →
/future-readers— the public-facing landing page students see - Reader Portal →
/future-readers/enroll— the enrollment form students fill out
4. Key Terms in Simple Language
| Term | What It Means |
|---|---|
| Institute | A school, college, or university participating in the Future Readers program |
| Enrollment | A student's application to join the program — either through the competition or discount route |
| Competition Route | The student submits a writing piece (essay, poem, short story). If approved, they get a 100% free subscription |
| Discount Route | The student uploads their student ID. If verified, they get a 50% discount coupon |
| Enrollment Status | Where the application is in the review process (see status table below) |
| Coupon Code | A unique code generated when an enrollment is approved. The student uses this at checkout |
| Audience Contact | When a student is approved, they are added to the Audience as a contact tagged "future_reader" for marketing purposes |
| Reference Data | Behind-the-scenes data that makes institutes appear in campaign form dropdowns |
| Source Institution | A Sales module institution that has been synced into the Future Readers program |
Enrollment Status Values
| Status | What It Means |
|---|---|
| Pending Review | The application has been submitted and is waiting for an admin to review it |
| Evaluating | An admin has started looking at the application but has not decided yet |
| Approved | The application has been approved |
| Coupon Generated | A coupon code has been created and emailed to the student |
| Subscription Created | The student has used their coupon and now has an active subscription |
| Rejected | The application was rejected (e.g., the writing did not meet criteria) |
| ID Rejected | The student ID could not be verified (blurry photo, wrong document, etc.) |
5. Step-by-Step Setup Guide
5.1 Creating and Managing Institutes
Before students can enroll, you need to add at least one institute to the system.
Adding a New Institute
- Go to Future Readers → Institutes in the Admin Console sidebar (or click "Manage Institutes" on the Future Readers dashboard).
- Click the "Add Institute" button in the top-right corner.
- A form modal appears. Fill in:
- Name — The full name of the institution (e.g., "Delhi University")
- Type — Select from the dropdown: School, College, or University
- City — The city where the institution is located (e.g., "New Delhi")
- State — The state (e.g., "Delhi")
- Click "Create".
The institute is now active and will appear in the student enrollment form's institute dropdown on the Reader Portal.
Editing an Institute
- Go to Future Readers → Institutes.
- Find the institute in the table.
- Click the Edit action (pencil icon) in the Actions column.
- Update any fields in the modal.
- Click "Update".
Deactivating an Institute
If an institute is no longer participating and you want to prevent new enrollments:
- Go to Future Readers → Institutes.
- Find the institute in the table.
- Click the Toggle Active/Inactive action in the Actions column.
Deactivated institutes no longer appear in the student enrollment form dropdown. Existing enrollments from that institute are not affected.
Deleting an Institute
- Click the Delete action in the Actions column.
- Confirm when prompted: "Are you sure you want to delete [institute name]?"
Note: If the institute has any enrollments, it will be deactivated (soft-deleted) instead of permanently removed. This preserves the enrollment history.
Viewing Active vs. All Institutes
- By default, the institutes page shows only active institutes.
- Click the "Show All" button to see both active and inactive institutes.
- Click "Active Only" to return to the filtered view.
5.2 Reviewing the Institute Detail Page
Click on any institute name in the institutes table to open its detail page. This page shows:
Metric Cards at the Top:
- Total Enrollments — All enrollments from this institute
- Pending Review — Enrollments awaiting review (Pending Review + Evaluating statuses)
- Approved — Successfully approved enrollments (Approved + Coupon Generated + Subscription Created)
- Audience Contacts — Number of students from this institute added to the marketing audience
Campaigns & Events Section:
- Shows all marketing campaigns linked to this institute
- Each campaign shows its name, status, type, submission counts, and date range
- If no campaigns are linked, you will see: "No campaigns linked to this institute yet." with a button to create one
Recent Enrollments Table:
- Shows the 20 most recent enrollments from this institute
- Columns: Student Name, Email, Type (Competition/Discount), Status, Coupon Code, Date
- Click "View All Enrollments" to go to the full enrollments page filtered to this institute
Quick Actions (bottom of page):
- Create Student Outreach Campaign — Opens the campaign creation page pre-linked to this institute
- Create Event — Opens event creation pre-linked to this institute
- Run Email Campaign — Opens email campaign creation with the institute's audience segment pre-selected
- View All Enrollments — Goes to the enrollments page filtered to this institute
5.3 How Students Enroll (Reader Portal)
This section describes what students see and do. Understanding this helps you support students and verify the flow.
Step 1 — Student Visits the Landing Page
The student goes to /future-readers on the Reader Portal. They see:
- A hero section explaining the program
- Two cards explaining the Writing Competition route (100% free subscription) and the Student Discount route (50% off)
- Eligibility information (School students class 9+, College undergraduates, University postgraduate/research)
- An FAQ section answering common questions
- An "Apply Now" button
Step 2 — Student Fills Out the Enrollment Form
The student clicks "Apply Now" and is taken to /future-readers/enroll. The form has these fields:
- Your Institute — A dropdown listing all active institutes. Format: "Institute Name — City, State". If their institute is not listed, there is a "Contact us" link.
- Your Name — Full name (text input)
- Email Address — Their email (where the coupon will be sent)
- Student ID Photo — Upload area (drag-and-drop or click to browse). Accepts PNG, JPG, JPEG. Maximum 5 MB.
- Choose Your Path — Two radio options:
- Writing Competition — "Win a free subscription"
- Student Discount — "50% off any plan"
- Your Writing Submission — (Only appears if they chose Writing Competition) A large text area where they write their essay, poem, or short story. A word count is displayed at the bottom-right.
The student clicks "Submit Application".
Step 3 — Confirmation
After successful submission, the student sees:
- A green checkmark icon
- "Application Submitted!" heading
- A message:
- If Competition: "Your writing submission has been received. Our editorial team will review it and notify you via email within a week."
- If Discount: "Your student ID is being verified. We will send you a discount coupon via email within 1-2 business days."
- Buttons to "Learn More" or "Back to Home"
What Prevents Submission
The form will not submit if:
- Any required field is empty
- The student ID file is larger than 5 MB
- The student has already applied with the same email address (they see: "You have already applied to the Future Readers program.")
- The selected institute is no longer active
- More than 5 submissions from the same IP address in one hour (rate limiting)
5.4 Reviewing Enrollments (Approval and Rejection)

This is the core workflow for program administrators.
Opening the Enrollment Review Queue
- Go to Future Readers → Enrollments in the sidebar (or click "Review Enrollments" on the Future Readers dashboard).
- You see the "Enrollment Review Queue" page with the subtitle "Review and approve/reject student enrollment applications".
Filtering Enrollments
Use the filter dropdowns at the top of the page:
- Status — Filter by: All Statuses, Pending Review, Evaluating, Approved, Rejected, Coupon Generated, Subscription Created, ID Rejected
- Institute — Filter by a specific institute or show all
- Type — Filter by: All Types, Competition, Discount
Viewing Enrollment Details
- Find the enrollment in the table.
- Click the eye icon in the Actions column.
- The "Enrollment Details" modal opens, showing:
- Student Name, Email, Institute, Enrollment Type, Status, Submission Date
- Coupon Code (if generated)
- Word Count (for competition entries)
- Student ID — The uploaded photo of the student's ID card
- Competition Entry — The full text of the writing submission (for competition entries only)
- Review Note — Any note added by the reviewer (if previously reviewed)
Approving an Enrollment
- From the enrollment details modal, click "Review" (or click the checkmark icon directly from the table).
- The "Review Enrollment" modal opens, showing:
- A summary box with: Student name, Institute, Type (Competition/Discount), Word Count
- The student ID image
- The competition entry text (if applicable)
- A "Review Note (optional)" text area — add any note about your decision
- Click the "Approve" button (green, with checkmark icon).
What happens on approval:
- The system generates a unique coupon code:
- Competition winners: Code starts with FR-WIN- (e.g., FR-WIN-A3B7C9D2), 100% discount
- Discount students: Code starts with FR-STU- (e.g., FR-STU-X4Y8Z1M5), 50% discount
- The coupon is valid for 90 days from the approval date
- The enrollment status changes to Coupon Generated
- The student receives an email with subject "Your Hyphen Future Readers coupon is ready!" containing:
- A congratulations message
- The coupon code displayed prominently
- A "Subscribe Now" button linking to the subscription page
- Information about the coupon validity (90 days)
- The student is added to the Audience Contacts list tagged as "future_reader"
Rejecting an Enrollment
- Open the Review modal (same steps as above).
- Optionally add a review note explaining the reason.
- Click the "Reject" button (red outline, with X icon).
The enrollment status changes to Rejected. No coupon is generated and no email is sent.
Which Enrollments Can Be Reviewed?
Only enrollments with status Pending Review or Evaluating can be reviewed. You will see the review action (checkmark icon) only for these statuses.
Pagination
- Enrollments are shown 20 per page.
- Navigate between pages using the Previous and Next buttons at the bottom.
- The page shows: "Page X of Y (Z results)".
5.5 Linking Institutes to Campaigns
You can connect Future Readers institutes to marketing campaigns and events. This helps track outreach efforts per institute.
From the Institute Detail Page
- Go to Future Readers → Institutes and click on an institute name.
- In the Quick Actions section at the bottom, click one of:
- "Create Student Outreach Campaign" — Opens the campaign creation page with the institute pre-linked
- "Create Event" — Opens event creation with the institute pre-linked
- "Run Email Campaign" — Opens email campaign creation with the institute's audience segment pre-selected
From the Campaign Creation Page
- Go to Marketing → Campaigns and create or edit a campaign.
- In the campaign form, use the institute picker to select one or more Future Readers institutes.
- Save the campaign.
Linked campaigns will appear on:
- The Future Readers dashboard under "Program Campaigns & Events"
- The Institute Detail Page under "Campaigns & Events"
5.6 Syncing Sales Institutions to Future Readers
If your sales team manages educational institutions in the Sales module, these can be synced into the Future Readers program.
Which institutions can be synced? Only institutions with type School or University are eligible. Corporate and library institution types are not synced.
How it works:
- A sales institution is created or updated in the Sales module.
- An admin triggers the sync (via the Sales institution's detail page or the sync API).
- The system creates a matching Future Readers institute, linked via the
sourceInstitutionIdfield. - If an institute with the same name already exists (case-insensitive), the system links to the existing one instead of creating a duplicate.
Daily Reconciliation: A cron job runs every day at 2 AM UTC to keep Future Readers institute data in sync with the reference data used by campaign form dropdowns. This happens automatically — no manual action is needed.
6. How to Verify It Worked
Use this checklist after performing key actions to confirm everything is working correctly.
After Adding an Institute
- The institute appears in the Future Readers → Institutes table with status "Active"
- The institute appears in the student enrollment form dropdown on the Reader Portal (
/future-readers/enroll) - The institute count on the Future Readers dashboard metric card ("Active Institutes") has increased
After a Student Submits an Enrollment
- The enrollment appears in Future Readers → Enrollments with status "Pending Review"
- The "Total Enrollments" and "Pending Review" counts on the dashboard have increased
- On the institute detail page, the enrollment appears in the "Recent Enrollments" table
- The student saw the success confirmation page
After Approving an Enrollment
- The enrollment status changed to "Coupon Generated"
- A coupon code is visible in the enrollment detail modal (starting with FR-WIN- or FR-STU-)
- The student received an email with subject "Your Hyphen Future Readers coupon is ready!"
- The email contains the correct coupon code and a "Subscribe Now" button
- The "Approved" count on the dashboard has increased
- The "Audience Contacts" count on the institute detail page has increased
- The coupon is valid for 90 days from the approval date
- The coupon gives the correct discount: 100% for competition, 50% for discount route
After Rejecting an Enrollment
- The enrollment status changed to "Rejected"
- No coupon code was generated
- No email was sent to the student
- The "Pending Review" count on the dashboard has decreased
After Linking a Campaign
- The campaign appears in the Future Readers dashboard under "Program Campaigns & Events"
- The campaign appears on the institute detail page under "Campaigns & Events"
- The campaign shows the correct institute count and submission counts
7. Worked Examples (End-to-End)
7.1 Example 1 — Setting Up a New Institute and Preparing It for Enrollment
Scenario: Your organization has partnered with St. Xavier's College in Mumbai. You need to add them to the Future Readers program so their students can apply.
Steps:
- Log in to the Admin Console.
- Go to Future Readers → Institutes in the sidebar.
- Click "Add Institute".
- Fill in:
- Name: St. Xavier's College
- Type: College
- City: Mumbai
- State: Maharashtra
- Click "Create".
- Verify: The institute now appears in the table with a green "Active" badge and 0 enrollments.
- Open the Reader Portal in a new tab and go to
/future-readers/enroll. - Verify: Click the "Your Institute" dropdown — "St. Xavier's College — Mumbai, Maharashtra" should appear in the list.
- Go back to the Admin Console. On the institute detail page (click the institute name), click "Create Student Outreach Campaign" to prepare a marketing campaign for the college.
- The institute is now ready. Share the enrollment link (
/future-readers/enroll) with the college's student body.
7.2 Example 2 — Processing a Competition Enrollment from Submission to Approval
Scenario: A student named Priya Sharma from Delhi University has submitted an essay through the Writing Competition route. You need to review and approve her entry.
Steps:
- Go to Future Readers → Enrollments.
- Use the filters:
- Status: Pending Review
- Type: Competition
- Find Priya Sharma's entry in the table.
- Click the eye icon to view her enrollment details.
- Review:
- Check her Student ID Photo — confirm it shows a valid Delhi University ID card with her name.
- Read her Competition Entry — the full text of her essay appears in the modal.
- Note the Word Count displayed.
- If the writing meets your criteria, click "Review" at the bottom of the detail modal.
- In the Review modal:
- Optionally add a review note: "Strong essay on contemporary Indian fiction. Approved for competition winner coupon."
- Click "Approve".
- Verify:
- The confirmation message shows: "Enrollment approved. 100% discount coupon generated: FR-WIN-XXXXXXXX"
- The enrollment status changes to Coupon Generated.
- Priya receives an email titled "Your Hyphen Future Readers coupon is ready!" with a coupon for a free annual subscription.
- In the institute detail page for Delhi University, the "Approved" count has increased by 1.
- In the Audience module, Priya appears as a contact tagged "future_reader".
7.3 Example 3 — Following Up on Pending Enrollments
Scenario: You notice that 15 enrollments have been sitting in "Pending Review" status for several days. You need to clear the backlog and follow up on any that need attention.
Steps:
- Go to Future Readers → Enrollments.
- Set the Status filter to "Pending Review".
- Work through each enrollment:
- Click the eye icon to view the details.
- For Discount route enrollments:
- Check the Student ID photo. Is it clear and valid?
- If yes → click "Review" → "Approve" (student gets 50% coupon via email).
- If the ID is blurry, wrong document, or unreadable → click "Review" → add a note: "Student ID photo is not legible. Please resubmit." → click "Reject".
- For Competition route enrollments:
- Read the writing submission.
- Evaluate quality against your program criteria.
- Approve or reject with a review note.
- Verify: After processing, check the dashboard:
- The "Pending Review" count should have decreased.
- The "Approved" count should reflect your approvals.
- If you want to reach students who were rejected and encourage them to reapply:
- Go to an institute's detail page.
- Click "Run Email Campaign" to compose an email to the institute's audience contacts.
Tip: Students whose enrollments were rejected can resubmit — they need to use a different email address since the system blocks duplicate email enrollments. Consider communicating this to rejected students via support.
7.4 Example 4 — Linking a Future Readers Initiative to a Campaign
Scenario: Your marketing team is running a "Back to Campus 2026" campaign targeting 5 universities. You want to link the Future Readers institutes to this campaign so you can track enrollment activity per campaign.
Steps:
- First, ensure all 5 universities are added as institutes in Future Readers → Institutes (see Example 1 if you need to add new ones).
- Go to Marketing → Campaigns.
- Click "Create Campaign" (or edit the existing "Back to Campus 2026" campaign).
- In the campaign form, find the institute picker field.
- Select the 5 universities from the dropdown.
- Save the campaign.
- Verify on the campaign side:
- The campaign should show "5 institutes linked."
- Verify on the Future Readers side:
- Go to Future Readers (the dashboard).
- Scroll to "Program Campaigns & Events" — the "Back to Campus 2026" campaign should appear with a badge showing 5 institutes.
- Click into any of the linked institutes — the campaign should appear in their "Campaigns & Events" section.
Alternative approach — Create a campaign directly from an institute:
- Go to Future Readers → Institutes and click on a university name.
- In the Quick Actions section, click "Create Student Outreach Campaign".
- You are taken to the campaign creation page with the institute already pre-linked.
- Fill in the campaign details and save.
7.5 Example 5 — Troubleshooting a Stuck Enrollment
Scenario: A student contacted support saying they applied 5 days ago but never received a coupon email. You need to investigate.
Steps:
-
Go to Future Readers → Enrollments.
-
Search for the student:
- You cannot search by name directly, so filter by Institute (if you know which one) and scan the table.
- Alternatively, check multiple pages using the pagination controls.
-
Find the student's enrollment and click the eye icon.
-
Check the Status:
Status You See What It Means What to Do Pending Review Nobody has reviewed it yet Review and approve/reject it now Evaluating Someone started reviewing but did not finish Complete the review now Approved Approved but coupon may not have generated Check if a coupon code is visible in the detail modal. If not, there may have been a system issue — escalate to engineering Coupon Generated Coupon was generated and email was sent The email may have gone to spam. Give the student their coupon code from the detail modal. The code starts with FR-WIN- or FR-STU- Rejected or ID Rejected The application was rejected Inform the student of the reason (check the Review Note). They can reapply with a different email address -
If the status is Coupon Generated and the student says they did not get the email:
- Copy the coupon code from the enrollment detail modal.
- Share it with the student directly via your support channel.
- Suggest they check their spam/junk folder.
- Remind them the coupon is valid for 90 days and they can use it at the subscription page.
-
If the enrollment does not appear at all:
- The student may not have completed the submission (they might have left the form without clicking "Submit Application").
- Ask the student to try again at
/future-readers/enroll. - If they get the error "You have already applied to the Future Readers program", it means an enrollment does exist — keep looking in the list or check with a different status filter.
8. Common Mistakes and How to Fix Them
Mistake 1: Institute Not Showing in Student Enrollment Form
Symptom: You added an institute, but students do not see it in the dropdown on the enrollment page.
Fix:
- Check that the institute is Active (green badge) in Future Readers → Institutes.
- If it is inactive, click the toggle action to reactivate it.
- The enrollment form dropdown only shows active institutes.
Mistake 2: Student Cannot Enroll — "Already Applied" Error
Symptom: A student sees "An enrollment with this email already exists" or "You have already applied to the Future Readers program."
Fix:
- The system only allows one active enrollment per email address. "Active" means any status except Rejected or ID Rejected.
- If the student's previous enrollment was rejected, they need to use a different email address to reapply.
- If their previous enrollment is still pending, find and process it in the admin queue.
Mistake 3: Coupon Email Not Received
Symptom: An enrollment shows "Coupon Generated" but the student says they never got the email.
Fix:
- Ask the student to check their spam/junk folder.
- Look up the coupon code in the enrollment detail modal and share it with the student manually.
- Verify that the email address on the enrollment is correct (typos happen).
- If emails are systematically not being sent, check that email sending is configured correctly (escalate to engineering if needed).
Mistake 4: Trying to Review an Already-Processed Enrollment
Symptom: You open an enrollment but the "Review" button does not appear.
Fix:
- Only enrollments with status Pending Review or Evaluating can be reviewed.
- If the status is already Coupon Generated, Approved, Rejected, or any other final status, the enrollment has already been processed.
- The review action (checkmark icon) only appears in the table for reviewable enrollments.
Mistake 5: Deleting an Institute With Enrollments
Symptom: You try to delete an institute, but it does not disappear from the list.
Fix:
- If an institute has enrollments, it cannot be permanently deleted. It is deactivated (soft-deleted) instead.
- This is by design — it preserves the enrollment history.
- The institute will show as "Inactive" and no longer appear in the student enrollment dropdown.
Mistake 6: Wrong Coupon Discount Amount
Symptom: A competition winner received a 50% coupon instead of 100% (or vice versa).
Fix:
- Coupon amounts are determined automatically based on the enrollment type:
- Competition → 100% discount (code starts with FR-WIN-)
- Discount → 50% discount (code starts with FR-STU-)
- If the wrong type was selected by the student, the coupon will reflect that type. You cannot change the coupon after it is generated.
- For exceptional cases, you may need to manually create a coupon from the subscription/coupon management area and share it with the student.
Mistake 7: Rate Limiting on the Enrollment Form
Symptom: A student sees "Too many requests. Please try again later."
Fix:
- The enrollment form is rate-limited to 5 submissions per IP address per hour.
- This protects against spam. If a legitimate student hits this limit (e.g., they are in a shared network like a college lab), ask them to try again after an hour.
Use this checklist to validate the Future Readers flow during testing or after a platform update.
- Create a new institute with all fields filled → verify it appears in the table with "Active" status
- Edit an institute's name, type, city, or state → verify the changes are saved
- Deactivate an institute → verify it no longer appears in the student enrollment dropdown
- Reactivate an institute → verify it reappears in the student enrollment dropdown
- Delete an institute with no enrollments → verify it is permanently removed
- Delete an institute with enrollments → verify it is deactivated (not deleted)
- Try creating an institute without filling all fields → verify error: "All fields are required"
- Verify institute type dropdown has exactly three options: School, College, University
- Visit
/future-readers→ verify the landing page loads with program info, two routes, eligibility, FAQ - Click "Apply Now" → verify the enrollment form loads at
/future-readers/enroll - Verify the institute dropdown shows only active institutes in "Name — City, State" format
- Submit a Discount enrollment with valid data → verify success page shows ID verification message
- Submit a Competition enrollment with valid data → verify success page shows editorial review message
- Verify the word count displays correctly for competition entries
- Upload a student ID larger than 5 MB → verify error: "File size must be less than 5MB"
- Submit without selecting an institute → verify error: "Please select your institute"
- Submit without choosing a path → verify error: "Please choose a program type"
- Submit without uploading student ID → verify error: "Please upload your student ID"
- Choose Competition but leave the writing area empty → verify error: "Please enter your competition text"
- Submit twice with the same email → verify error: "You have already applied to the Future Readers program."
- Submit 6 times in one hour from the same IP → verify rate limit error on the 6th attempt
- New enrollments appear in the queue with status "Pending Review"
- Filter by Status → verify correct enrollments shown
- Filter by Institute → verify correct enrollments shown
- Filter by Type (Competition/Discount) → verify correct enrollments shown
- View enrollment detail modal → verify all fields display correctly
- View a Competition enrollment → verify the writing submission and word count are visible
- View a Discount enrollment → verify the student ID photo is visible
- Approve a Competition enrollment → verify:
- Status changes to "Coupon Generated"
- Coupon code starts with "FR-WIN-"
- Coupon is 100% discount
- Student receives email with coupon
- Student appears in Audience Contacts as "future_reader"
- Approve a Discount enrollment → verify:
- Status changes to "Coupon Generated"
- Coupon code starts with "FR-STU-"
- Coupon is 50% discount
- Student receives email with coupon
- Reject an enrollment → verify:
- Status changes to "Rejected"
- No coupon code generated
- No email sent
- Add a review note → verify it appears in the enrollment detail modal afterward
- Verify the review button does NOT appear for already-processed enrollments
- Test pagination with more than 20 enrollments
- Verify "Total Enrollments" count matches actual enrollments
- Verify "Pending Review" count matches enrollments with Pending Review status
- Verify "Approved" count matches Approved + Coupon Generated + Subscription Created
- Verify "Active Institutes" count matches active institutes
- Click "Manage Institutes" → verify it navigates to the institutes page
- Click "Review Enrollments" → verify it navigates to the enrollments page
- Verify linked campaigns appear under "Program Campaigns & Events"
- Link an institute to a campaign → verify it appears in the institute detail page
- Create a campaign from an institute's Quick Actions → verify the institute is pre-linked
- Verify campaign appears on the Future Readers dashboard
- Verify coupon is valid for 90 days from approval date
- Verify coupon is single-use (maxUses: 1)
- Verify the email subject is "Your Hyphen Future Readers coupon is ready!"
- Verify the email contains the correct coupon code, discount info, and "Subscribe Now" link
- Verify the student can use the coupon at checkout for the correct discount
- A user without SUBSCRIPTIONS_READ cannot access the Future Readers pages
- A user without SUBSCRIPTIONS_CREATE cannot see the "Add Institute" button
- A user without SUBSCRIPTIONS_UPDATE cannot see the review action or edit/delete institutes
- A user without MARKETING_CAMPAIGNS_UPDATE cannot see the campaign quick actions on institute detail
-
No search on the enrollments page. You cannot search for a specific student by name or email. You must use the filters (Status, Institute, Type) and browse through the paginated list. For large volumes, this can be time-consuming.
-
Rejected students cannot reapply with the same email. The system blocks duplicate enrollments by email address. A student whose enrollment was rejected must use a different email address to reapply. There is no "reopen" or "resubmit" action for rejected enrollments.
-
No bulk review. Enrollments must be approved or rejected one at a time. There is no "approve all" or "reject all" action for processing multiple enrollments at once.
-
No notification to admin for new enrollments. When a student submits an enrollment, no alert or notification is sent to the admin team. Admins must periodically check the enrollment queue for new submissions.
-
Coupon codes cannot be regenerated. Once a coupon is generated for an approved enrollment, it cannot be changed, extended, or reissued from the enrollment page. If a coupon expires or is lost, a new coupon must be created manually from the subscription/coupon management area.
-
No direct rejection reason email to students. When an enrollment is rejected, the review note is stored internally but no email is sent to the student explaining why. You need to communicate rejection reasons through your support channels.
-
Institute "Other" option not available on the enrollment form. Unlike campaign forms (which have an "Other" option for unlisted institutions), the student enrollment form only shows pre-configured institutes. Students whose institute is not listed must contact support.
-
Enrollment type cannot be changed after submission. If a student accidentally selected "Discount" instead of "Competition" (or vice versa), the enrollment type cannot be changed. The student would need to submit a new application with a different email.
-
Cron job dependency. The daily reference data sync cron runs at 2 AM UTC. If a new institute is created and a campaign form is accessed before the next sync, the institute may not appear in campaign form dropdowns until the next cron run. However, direct institute management and student enrollment dropdowns update immediately.
This user manual reflects the Future Readers program as implemented in the Hyphen platform as of March 2026. All features described above are fully implemented and operational unless noted in the Known Limitations section.